Handling User Authentication With Firebase In Your React Apps

Nowadays, security is very important on websites and apps. That’s mainly to ensure that private data is not leaked to the public and someone doesn’t do actions on your behalf.
Today, we are going to use Firebase, which is a BaaS that helps us with various services such as database authentication and cloud storage. We are going to see how we can use the authentication service in Firebase to secure our React app.
Requirements for authenticating with Firebase in React
- Node.js installed
- Code editor — I prefer Visual Studio Code
- Google account — we need this to use Firebase
- Basic knowledge of React — I won’t recommend this tutorial for complete beginners in React
Setting up Firebase
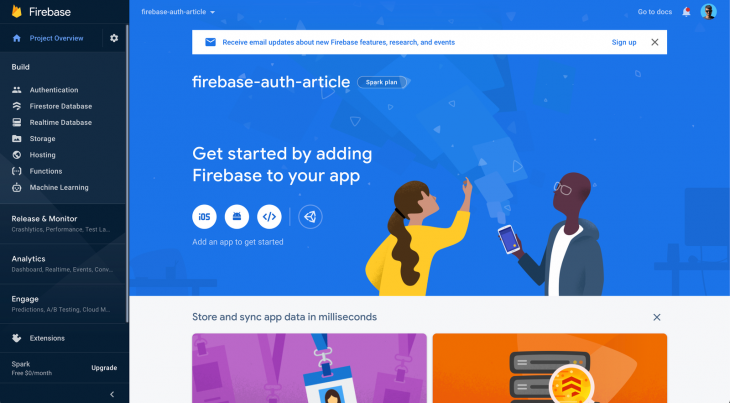
Before we dive into React and start coding some good stuff, we need to set up our own Firebase project through the Firebase Console. To get started, navigate your browser to Firebase Console. Make sure you are logged into your Google account.
Now, click on Add project and you should be presented with the following screen:
Once you’ve given it a sweet name, click on Continue and you should be prompted for an option to enable Google Analytics. We don’t need Google Analytics for this tutorial, but turning it on won’t do harm, so go ahead and turn it on if you want.
Once you’ve completed all the steps, you should be presented with the dashboard, which looks something like this:
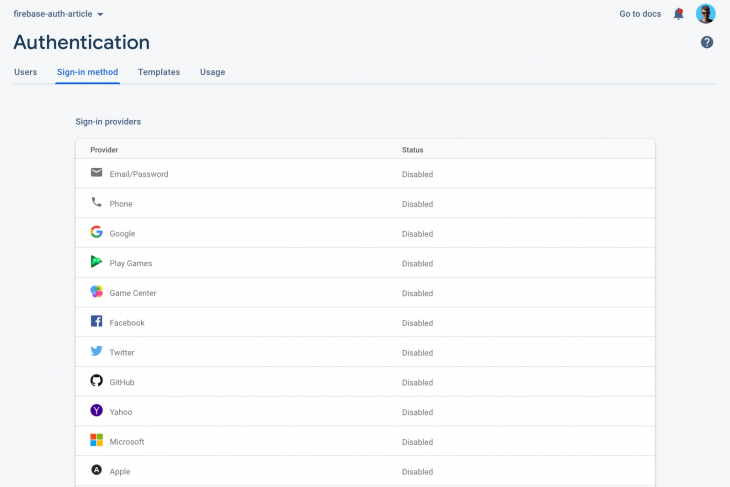
First, let’s set up authentication. Click on Authentication on the sidebar and click on Get Started to enable the module. Now you will be presented with various authentication options:
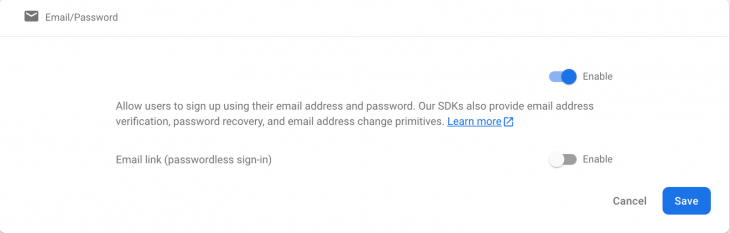
First click on Email/Password, enable it, and save it:
Now press on Google:
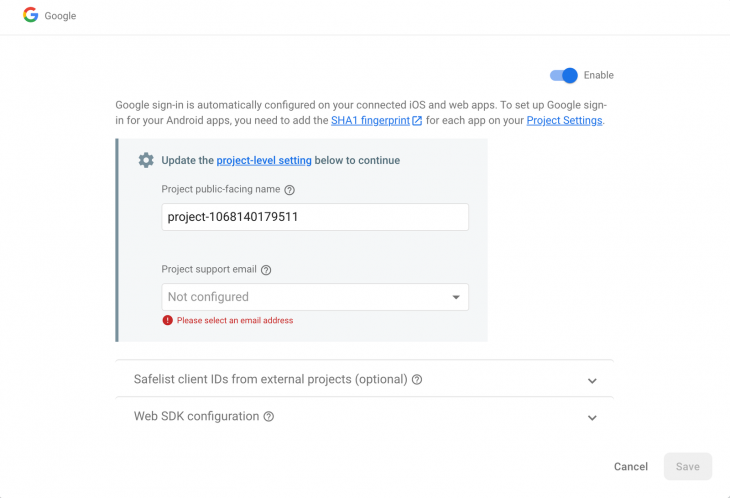
Press enable, select a project support email address, and click on Save to activate Google Authentication for our app.
Now, let’s set up the database we are going to use for our project, which is Cloud Firestore. Click on Cloud Firestore on the sidebar and click on Create Database. You should be presented with the following dialog:
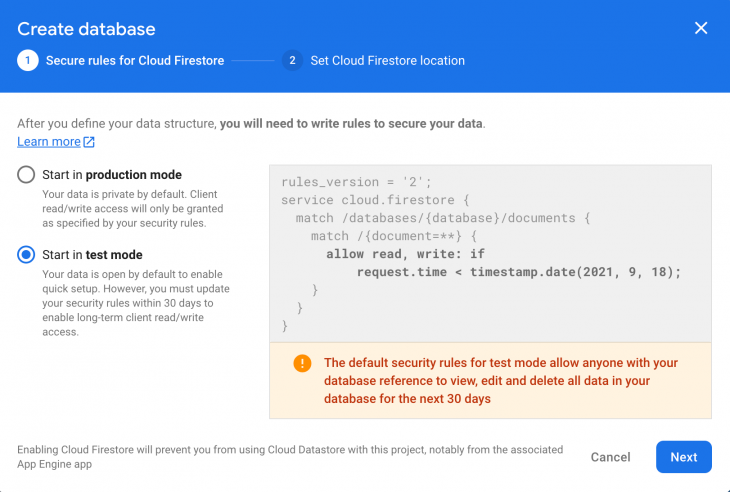
Remember to select Start in test mode. We are using test mode because we are not dealing with production-level applications in this tutorial. Production mode databases require a configuration of security rules, which is out of the scope of this tutorial.
Click Next. Select the region. I’ll leave it to the default, and then press Enable. This should completely set up your Cloud Firestore database.
Creating and setting up a React app
Navigate to a safe folder and type the following command in the terminal to create a new React app:
npx create-react-app appname
Remember to replace appname with a name of your choice. The name doesn’t really affect how the tutorial works. Once the React app is successfully created, type the command to install a few npm packages we will need throughout the project:
npm install firebase react-router-dom react-firebase-hooks
Here, we are installing firebase to communicate with Firebase services, and we are also installing react-router-dom to handle the routing of the application. We use react-firebase-hooks to manage the authentication state of the user.
Type the following command to run your React app:
cd appname && npm start
This should fire up your browser and you should see the following screen:

Now, let’s do some cleanup so that we can continue with coding. Delete the following files from the src folder: App.test.js, logo.svg, and setupTests.js. Once you delete these files, delete all the contents of App.css and you will see an error on the React app. Don’t worry; just remove the logo imports in App.js and empty the div so that your App.js looks like this:
import './App.css';
function App() {
  return (
    <div className="app">

    </div>
  );
}
export default App;
Integrating Firebase into our React app
Go to your Firebase Console dashboard, click on Project Settings, scroll down, and you should see something like this:
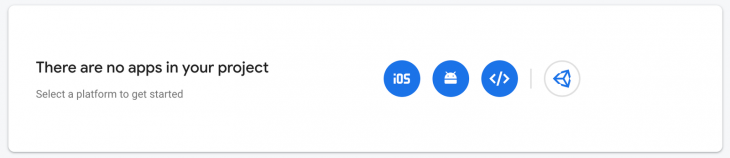
Click on the third icon to configure our Firebase project for the web. Enter the app name and click on Continue. Go back to the project settings and you should now see a config like this:
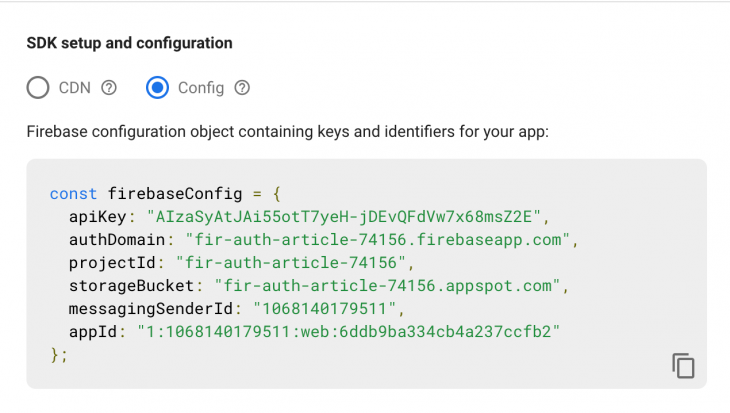
Copy the config. Create a new file in the src folder named firebase.js. Let’s first import firebase modules, since Firebase uses modular usage in v9:
import { initializeApp } from "firebase/app";
import {
GoogleAuthProvider,
getAuth,
signInWithPopup,
signInWithEmailAndPassword,
createUserWithEmailAndPassword,
sendPasswordResetEmail,
signOut,
} from "firebase/auth";
import {
getFirestore,
query,
getDocs,
collection,
where,
addDoc,
} from "firebase/firestore";
Now paste in the config we just copied. Let’s initialize our app and services so that we can use Firebase throughout our app:
const app = initializeApp(firebaseConfig);
const auth = getAuth(app);
const db = getFirestore(app);
This will use our config to recognize the project and initialize authentication and database modules.
We will be creating all important authentication-related functions in firebase.js itself. So first look at the Google Authentication function:
const googleProvider = new GoogleAuthProvider();
const signInWithGoogle = async () => {
  try {
    const res = await signInWithPopup(auth, googleProvider);
    const user = res.user;
    const q = query(collection(db, "users"), where("uid", "==", user.uid));
    const docs = await getDocs(q);
    if (docs.docs.length === 0) {
      await addDoc(collection(db, "users"), {
        uid: user.uid,
        name: user.displayName,
        authProvider: "google",
        email: user.email,
      });
    }
  } catch (err) {
    console.error(err);
    alert(err.message);
  }
};
In the above code block, we are using a try…catch block along with async functions so that we can handle errors easily and avoid callbacks as much as possible.
First, we are attempting to log in using the GoogleAuthProvider Firebase provides us. If the authentication fails, the flow is sent to the catch block.
Then we are querying the database to check if this user is registered in our database with the user uid. And if there is no user with the uid, which also means that the user is new to our app, we make a new record in our database with additional data for future reference.
Now let’s make a function for signing in using an email and password:
const logInWithEmailAndPassword = async (email, password) => {
  try {
    await signInWithEmailAndPassword(auth, email, password);
  } catch (err) {
    console.error(err);
    alert(err.message);
  }
};
This code is very simple. Since we know that the user is already registered with us, we don’t need to check the database. We can proceed with the authentication right away. We just pass in the email and password to signInWithEmailAndPassword functions, which is provided to us by Firebase.
Now, let’s create a function for registering a user with an email and password:
const registerWithEmailAndPassword = async (name, email, password) => {
  try {
    const res = await createUserWithEmailAndPassword(auth, email, password);
    const user = res.user;
    await addDoc(collection(db, "users"), {
      uid: user.uid,
      name,
      authProvider: "local",
      email,
    });
  } catch (err) {
    console.error(err);
    alert(err.message);
  }
};
Since we know that the user is new to our app, we create a record for the user without checking if there is one existing in our database. It’s similar to the approach we used in Google Authentication but without checks.
Create a function that will send a password reset link to an email address:
const sendPasswordReset = async (email) => {
  try {
    await sendPasswordResetEmail(auth, email);
    alert("Password reset link sent!");
  } catch (err) {
    console.error(err);
    alert(err.message);
  }
};
This code is simple. We are just passing in the email in the sendPasswordResetEmail function provided by Firebase. The password reset email will be sent by Firebase.
And finally, the logout function:
const logout = () => {
  signOut(auth);
};
Nothing much here, just firing up the signOut function from Firebase, and Firebase will do its magic and log out the user for us.
Finally we export all the functions, and here’s how your firebase.js should finally look:
import { initializeApp } from "firebase/app";
import {
  GoogleAuthProvider,
  getAuth,
  signInWithPopup,
  signInWithEmailAndPassword,
  createUserWithEmailAndPassword,
  sendPasswordResetEmail,
  signOut,
} from "firebase/auth";
import {
  getFirestore,
  query,
  getDocs,
  collection,
  where,
  addDoc,
} from "firebase/firestore";
const firebaseConfig = {
  apiKey: "AIzaSyDIXJ5YT7hoNbBFqK3TBcV41-TzIO-7n7w",
  authDomain: "fir-auth-6edd8.firebaseapp.com",
  projectId: "fir-auth-6edd8",
  storageBucket: "fir-auth-6edd8.appspot.com",
  messagingSenderId: "904760319835",
  appId: "1:904760319835:web:44fd0d957f114b4e51447e",
  measurementId: "G-Q4TYKH9GG7",
};
const app = initializeApp(firebaseConfig);
const auth = getAuth(app);
const db = getFirestore(app);
const googleProvider = new GoogleAuthProvider();
const signInWithGoogle = async () => {
  try {
    const res = await signInWithPopup(auth, googleProvider);
    const user = res.user;
    const q = query(collection(db, "users"), where("uid", "==", user.uid));
    const docs = await getDocs(q);
    if (docs.docs.length === 0) {
      await addDoc(collection(db, "users"), {
        uid: user.uid,
        name: user.displayName,
        authProvider: "google",
        email: user.email,
      });
    }
  } catch (err) {
    console.error(err);
    alert(err.message);
  }
};
const logInWithEmailAndPassword = async (email, password) => {
  try {
    await signInWithEmailAndPassword(auth, email, password);
  } catch (err) {
    console.error(err);
    alert(err.message);
  }
};
const registerWithEmailAndPassword = async (name, email, password) => {
  try {
    const res = await createUserWithEmailAndPassword(auth, email, password);
    const user = res.user;
    await addDoc(collection(db, "users"), {
      uid: user.uid,
      name,
      authProvider: "local",
      email,
    });
  } catch (err) {
    console.error(err);
    alert(err.message);
  }
};
const sendPasswordReset = async (email) => {
  try {
    await sendPasswordResetEmail(auth, email);
    alert("Password reset link sent!");
  } catch (err) {
    console.error(err);
    alert(err.message);
  }
};
const logout = () => {
  signOut(auth);
};
export {
  auth,
  db,
  signInWithGoogle,
  logInWithEmailAndPassword,
  registerWithEmailAndPassword,
  sendPasswordReset,
  logout,
};
Next, let’s work on the actual functionality.
Creating the login page
Create two new files to create a new component, Login.js and Login.css. I highly recommend installing ES7 snippets in Visual Studio Code so that you can just start typing rfce and press Enter to create a component boilerplate.
Now, let’s assign this component to a route. To do that, we need to configure React Router. Go to App.js and import the following:
import { BrowserRouter as Router, Route, Routes } from "react-router-dom";
Then, in the JSX part of App.js, add the following configuration to enable routing for our app:
<div className="app">
  <Router>
    <Switch>
      <Route exact path="/" component={Login} />
    </Switch>
  </Router>
</div>
Remember to import the Login component on the top!
Go to Login.css and add the following styles. We won’t be focusing on styling much, so here are the styles for you to use:
.login {
  height: 100vh;
  width: 100vw;
  display: flex;
  align-items: center;
  justify-content: center;
}
.login__container {
  display: flex;
  flex-direction: column;
  text-align: center;
  background-color: #dcdcdc;
  padding: 30px;
}
.login__textBox {
  padding: 10px;
  font-size: 18px;
  margin-bottom: 10px;
}
.login__btn {
  padding: 10px;
  font-size: 18px;
  margin-bottom: 10px;
  border: none;
  color: white;
  background-color: black;
}
.login__google {
  background-color: #4285f4;
}
.login div {
  margin-top: 7px;
}
Go to Login.js, and let’s look at how our login functionality works:
import React, { useEffect, useState } from "react";
import { Link, useNavigate } from "react-router-dom";
import { auth, signInWithEmailAndPassword, signInWithGoogle } from "./firebase";
import { useAuthState } from "react-firebase-hooks/auth";
import "./Login.css";
function Login() {
  const [email, setEmail] = useState("");
  const [password, setPassword] = useState("");
  const [user, loading, error] = useAuthState(auth);
  const navigate = useNavigate();
  useEffect(() => {
    if (loading) {
      // maybe trigger a loading screen
      return;
    }
    if (user) navigate("/dashboard");
  }, [user, loading]);
  return (
    <div className="login">
      <div className="login__container">
        <input
          type="text"
          className="login__textBox"
          value={email}
          onChange={(e) => setEmail(e.target.value)}
          placeholder="E-mail Address"
        />
        <input
          type="password"
          className="login__textBox"
          value={password}
          onChange={(e) => setPassword(e.target.value)}
          placeholder="Password"
        />
        <button
          className="login__btn"
          onClick={() => signInWithEmailAndPassword(email, password)}
        >
          Login
        </button>
        <button className="login__btn login__google" onClick={signInWithGoogle}>
          Login with Google
        </button>
        <div>
          <Link to="/reset">Forgot Password</Link>
        </div>
        <div>
          Don't have an account? <Link to="/register">Register</Link> now.
        </div>
      </div>
    </div>
  );
}
export default Login;
The above code might look long and hard to understand, but it’s really not. We have already covered the main authentication parts and now we are just implementing them in our layouts.
Here’s what’s happening in the above code block. We are using the functions we made in firebase.js for authentication. We are also using react-firebase-hooks along with useEffect to track the authentication state of the user. So, if the user gets authenticated, the user will automatically get redirected to the dashboard, which we are yet to make.
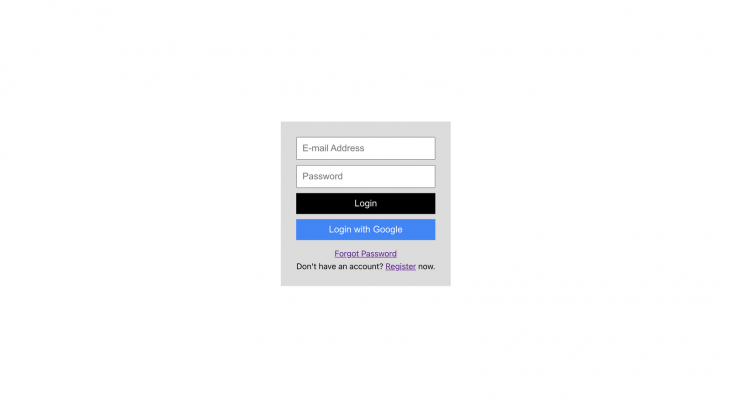
Here’s what you’ll see on your screen:
Create a new component called Register to handle user registrations. Here are the styles for Register.css:
.register {
  height: 100vh;
  width: 100vw;
  display: flex;
  align-items: center;
  justify-content: center;
}
.register__container {
  display: flex;
  flex-direction: column;
  text-align: center;
  background-color: #dcdcdc;
  padding: 30px;
}
.register__textBox {
  padding: 10px;
  font-size: 18px;
  margin-bottom: 10px;
}
.register__btn {
  padding: 10px;
  font-size: 18px;
  margin-bottom: 10px;
  border: none;
  color: white;
  background-color: black;
}
.register__google {
  background-color: #4285f4;
}
.register div {
  margin-top: 7px;
}
After that, let’s look at how the register functionality is implemented in the layout. Use this layout in Register.js:
import React, { useEffect, useState } from "react";
import { useAuthState } from "react-firebase-hooks/auth";
import { Link, useHistory } from "react-router-dom";
import {
  auth,
  registerWithEmailAndPassword,
  signInWithGoogle,
} from "./firebase";
import "./Register.css";
function Register() {
  const [email, setEmail] = useState("");
  const [password, setPassword] = useState("");
  const [name, setName] = useState("");
  const [user, loading, error] = useAuthState(auth);
  const history = useHistory();
  const register = () => {
    if (!name) alert("Please enter name");
    registerWithEmailAndPassword(name, email, password);
  };
  useEffect(() => {
    if (loading) return;
    if (user) history.replace("/dashboard");
  }, [user, loading]);
  return (
    <div className="register">
      <div className="register__container">
        <input
          type="text"
          className="register__textBox"
          value={name}
          onChange={(e) => setName(e.target.value)}
          placeholder="Full Name"
        />
        <input
          type="text"
          className="register__textBox"
          value={email}
          onChange={(e) => setEmail(e.target.value)}
          placeholder="E-mail Address"
        />
        <input
          type="password"
          className="register__textBox"
          value={password}
          onChange={(e) => setPassword(e.target.value)}
          placeholder="Password"
        />
        <button className="register__btn" onClick={register}>
          Register
        </button>
        <button
          className="register__btn register__google"
          onClick={signInWithGoogle}
        >
          Register with Google
        </button>
        <div>
          Already have an account? <Link to="/">Login</Link> now.
        </div>
      </div>
    </div>
  );
}
export default Register;
Here, we are using similar approach as we used in the Login component. We are just using the functions we previously created in firebase.js. Again, here we are using useEffect along with react-firebase-hooks to keep track of user authentication status.
Let’s look at resetting passwords. Create a new component called Reset, and here’s the styling for Reset.css:
.reset {
  height: 100vh;
  width: 100vw;
  display: flex;
  align-items: center;
  justify-content: center;
}
.reset__container {
  display: flex;
  flex-direction: column;
  text-align: center;
  background-color: #dcdcdc;
  padding: 30px;
}
.reset__textBox {
  padding: 10px;
  font-size: 18px;
  margin-bottom: 10px;
}
.reset__btn {
  padding: 10px;
  font-size: 18px;
  margin-bottom: 10px;
  border: none;
  color: white;
  background-color: black;
}
.reset div {
  margin-top: 7px;
}
This is the layout for Reset.js:
import React, { useEffect, useState } from "react";
import { useAuthState } from "react-firebase-hooks/auth";
import { useNavigate } from "react-router-dom";
import { Link } from "react-router-dom";
import { auth, sendPasswordResetEmail } from "./firebase";
import "./Reset.css";
function Reset() {
  const [email, setEmail] = useState("");
  const [user, loading, error] = useAuthState(auth);
  const navigate = useNavigate();
  useEffect(() => {
    if (loading) return;
    if (user) navigate("/dashboard");
  }, [user, loading]);
  return (
    <div className="reset">
      <div className="reset__container">
        <input
          type="text"
          className="reset__textBox"
          value={email}
          onChange={(e) => setEmail(e.target.value)}
          placeholder="E-mail Address"
        />
        <button
          className="reset__btn"
          onClick={() => sendPasswordResetEmail(email)}
        >
          Send password reset email
        </button>
        <div>
          Don't have an account? <Link to="/register">Register</Link> now.
        </div>
      </div>
    </div>
  );
}
export default Reset;
This is similar to what we did for the Login and Register components. We are simply using the functions we created earlier.
Now, let’s focus on the dashboard. Create a new component called Dashboard, and here’s the styling for Dashboard.css:
.dashboard {
  height: 100vh;
  width: 100vw;
  display: flex;
  align-items: center;
  justify-content: center;
}
.dashboard__container {
  display: flex;
  flex-direction: column;
  text-align: center;
  background-color: #dcdcdc;
  padding: 30px;
}
.dashboard__btn {
  padding: 10px;
  font-size: 18px;
  margin-top: 10px;
  border: none;
  color: white;
  background-color: black;
}
.dashboard div {
  margin-top: 7px;
}
And here’s the layout for Dashboard.js:
import React, { useEffect, useState } from "react";
import { useAuthState } from "react-firebase-hooks/auth";
import { useNavigate } from "react-router-dom";
import "./Dashboard.css";
import { auth, db, logout } from "./firebase";
import { query, collection, getDocs, where } from "firebase/firestore";
function Dashboard() {
  const [user, loading, error] = useAuthState(auth);
  const [name, setName] = useState("");
  const navigate = useNavigate();
  const fetchUserName = async () => {
    try {
      const q = query(collection(db, "users"), where("uid", "==", user?.uid));
      const doc = await getDocs(q);
      const data = doc.docs[0].data();
      setName(data.name);
    } catch (err) {
      console.error(err);
      alert("An error occured while fetching user data");
    }
  };
  useEffect(() => {
    if (loading) return;
    if (!user) return navigate("/");
    fetchUserName();
  }, [user, loading]);
  return (
    <div className="dashboard">
       <div className="dashboard__container">
        Logged in as
         <div>{name}</div>
         <div>{user?.email}</div>
         <button className="dashboard__btn" onClick={logout}>
          Logout
         </button>
       </div>
     </div>
  );
}
export default Dashboard;
Unlike the other components, there’s something else we are doing here. We are checking the authentication state. If the user is not authenticated, we redirect the user to the login page.
We are also fetching our database and retrieving the name of the user based on the uid of the user. Finally, we are rendering out everything on the screen.
Lastly, let’s add everything to the router. Your App.js should look like this:
import "./App.css";
import { BrowserRouter as Router, Route, Routes } from "react-router-dom";
import Login from "./Login";
import Register from "./Register";
import Reset from "./Reset";
import Dashboard from "./Dashboard";
function App() {
  return (
    <div className="app">
      <Router>
        <Routes>
          <Route exact path="/" element={<Login />} />
          <Route exact path="/register" element={<Register />} />
          <Route exact path="/reset" element={<Reset />} />
          <Route exact path="/dashboard" element={<Dashboard />} />
        </Routes>
      </Router>
    </div>
  );
}
export default App;
The app is fully functional!
What's next?
Once you’re done with this build, I want you to play around with this. Try adding Facebook authentication next. What about GitHub authentication? I’d say keep experimenting with the code because that’s how you practice and learn things. If you just keep copying the code, you won’t understand the fundamentals of Firebase.